Easy ways to preserve tomatoes off the grid

Tasty organic tomatoes, ready to preserve for the winter months

In A Year in an Off-Grid Kitchen I included recipes for five of my favourite ways to preserve tomatoes with water bath canning – as tomato passata, tomatoes in brine, pizza sauce, salsa, and tomato relish. I’ve recently tried a couple of different methods that I’d like to share here.

Fermenting tomatoes

I’ve been intrigued about fermenting tomatoes for a while, ever since reading Shannon Stonger’s Traditionally Fermented Foods. it seems like such a simple and low energy way to preserve tomatoes, and perfect for preserving the garden harvest as it makes it to the kitchen, because you don’t need a huge amount of tomatoes to justify boiling up the canner, you can just preserve one jar at a time. Tomato season is a busy time on the homestead, and having a way to just quickly preserve things without much fuss is very welcome!

I tested this recipe out, left them alone for nearly a year, and they were still good to eat after that long. Tomatoes are a bit naughty in the jar and have a habit of rising above the fermenting weight (which is why in the photo you can see lots of tomatoes trying to jump out of the jar!), even then in my Fido jar, they were still really good to eat. I definitely recommend checking out Shannon’s fermenting book for more tasty fermenting recipes.

Fermented tomatoes

How to ferment tomatoes:

Pack whole, firm tomatoes up to the ‘shoulders’ of a fermenting jar – I use Fido jars, but mason jars can work too if you remember to ‘burp’ them once a day for the first week or two, or until the bubbling stops.

Add around 3 tablespoons unrefined salt, plus an optional tablespoon of fresh whey or sauerkraut juice for every litre (quart) jar.

Top with non-chlorinated water to above the level of the tomatoes

Weigh the tomatoes down with a fermenting weight, or with a cabbage leaf weighed down with a boiled rock or other heat-sterilised heavy thing.

Put the lid on and leave it at around 23ºC (73ºF) for a week or two, or until the bubbling dies down, then move to root cellar, larder, or fridge conditions of around 15ºC (59ºF) or lower where they will store for up to a year.

Use these fermented tomatoes anywhere that you’d normally add tomatoes – salads, soups, stews, sauces, and more. This is a great low energy way to preserve tomatoes.

Drying tomatoes

One of my favourite tomato varieties to grow is Principe Borghese, In my garden, this is a resilient variety that fruits very early, produces an abundance of tasty red cherry tomatoes that are great either raw or cooked, and it seems pretty resistant to pests. Last tomato season here was rainier and colder than usual, and I grew both this and “Gold Nugget” which is the earliest fruiting tomato that I know of, and Principe Borghese was the first to have ripe fruit, and was very plentiful. It’s also grown well for me in dry warm summers.

Principe Borghese is well-known as a good tomato for drying, but I’ve never grown it for that reason, just for all the reasons above. Last season I experimented with drying them in the wood stove.

Crispy dried tomatoes

How to dry tomatoes:

Slice them in half. Place them cut-side up on a baking sheet. Put them in a very low oven with the door ajar – I dried mine at the bottom of the top oven of the wood stove as it died down for the night, and also in the warming oven all day. Once the tomatoes have mostly dried out on that side, flip them over and dry the other side.

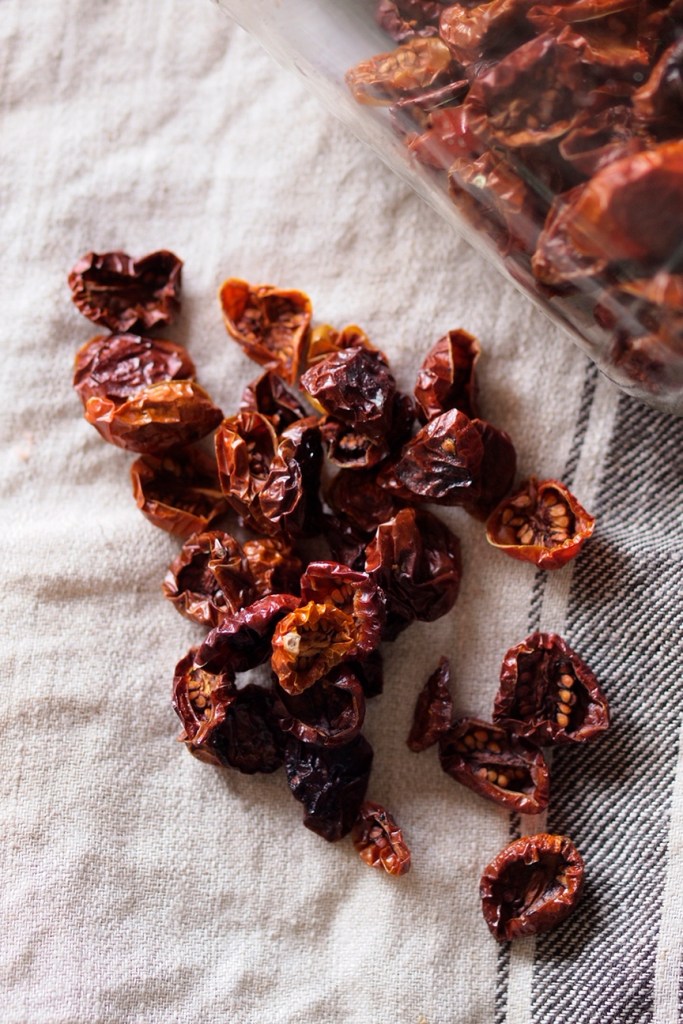
Once the tomatoes are fully dry, they will be crispy and full of flavour.

Tomatoes can also be dried in a solar dehydrator in a similar way – just dry cut-side up until that side is almost dry, then flip over and dry until crisp.

Tomatoes with more flesh and less juice and seeds, such as Amish Paste, Roma, Principe Borghese, and other sauce-type tomatoes are the best choices for drying, but any tomato can be dried in this way.

Store dried tomatoes an airtight container such as a glass jar with lid. If kept dry, they will keep well for a year or more.

Dried tomatoes are great smashed up and sprinkled on salads, on top of pizza, or added to stews, soups, sauces, and more.

For more recipes and ideas for cooking and preserving homegrown tomatoes, see my book A Year in an Off-Grid Kitchen

A Year in an Off-Grid Kitchen: Homestead Kitchen Skills and Real Food Recipes for Resilient Health

Enter your email address here to get new blog posts from The Nourishing Hearthfire.

Building a better world… with tomatoes and goats

OLYMPUS DIGITAL CAMERA

Sometimes it’s hard to feel anything but angry about the current state of things, but there are lots of positive actions that can be done that boost personal resilience and wellbeing as well as reducing ecological footprints.

There’s a new book all about this, currently on Kickstarter here. My new book ‘Backyard Dairy Goats‘ is included as a stretch goal on it!

Preserving tomatoes at home

This year I did something I’d been thinking about for a long time. I bottled our entire tomato supply for the year…

I’d delayed this in the past due to annoying finicky instructions that insist on peeling the tomatoes, removing seeds, putting them through an expensive single-purpose gadget, and all kinds of stuff, but in the end I thought it was about time I tried this myself, using nothing more than a kitchen knife.

Our own garden harvest was not that big this year, for a few reasons that I’ve hopefully learned from, but rather than buying in bottled tomatoes from the other side of the world, I found a local organic grower, bought more than 30kg of sauce-grade tomatoes and bottled them all.

This is how we did it:

Step 1:
This step is only worth doing if you have too many tomatoes to fit in your pot at once. Sort through all the tomatoes and separate the damaged and super-ripe ones from the ones that can wait for a bit longer. Put the ones that can wait aside for another day (we preserved our 30kg+ of tomatoes over 3 days).

Step 2:
Wash the tomatoes, remove any leaves and stems (this is a good job for little helpers).

Step 3:
Roughly chop the tomatoes and put them in a big stainless steel pot (I used my 20 litre one).

Step 4:
Heat the chopped tomatoes over medium-high heat, smashing them up as you stir every so often. Once the tomatoes are bubbling you can either bottle them now, or reduce them for a bit. The jars I used were a bit smaller than the passata bottles I’m used to, so I chose to boil them to reduce them by around 1/4 to 1/3, to make for a more concentrated jar of tomato goodness. If you’re using plum tomatoes or paste tomatoes you’re more likely to get away with boiling them for less time, but ‘sauce tomatoes’ here just means any tomatoes that aren’t quite perfect, so they can use a bit of boiling to get rid of the extra liquid.

While you’re waiting for the tomatoes to heat up or reduce, sterilise your jars and lids and keep them warm.

Step 5:
If you’re concerned about the tomatoes not being acidic enough on their own to store safely, then add a tablespoon of cider vinegar or lemon juice to each 500-600ml jar, or 2 tablespoons to larger jars.

Put the hot tomatoes in the warm jars and seal them with their clips or rings, depending on which jar type you’re using. Put a big canning pot with a false bottom or canning rack on the stove (or use a tea towel or some cutlery at the bottom of a normal pot), put a small amount of warm water in it (so that the hot jars aren’t shocked by a sudden change of temperature), then carefully add your jars. Add more water, so that the jars are surrounded by water either to just above the top of the lid, or at least 3/4 of the way up.

Put the lid on the pot and bring it to the boil, or at least above 90ºC (195ºF). Hold it at this temperature for 40-45 minutes, then allow the pot to sit with the lid off for 5 minutes. Carefully remove the jars using a jar lifter and allow them to cool on the bench before storing.

Fill up the next batch of jars for the pot and repeat until you’ve run out of hot tomatoes, making sure that the water in the pot at the beginning is around the same temperature as the jars. You can do this over two or more days, as long as the tomatoes are brought to the boil and kept hot for a while before bottling, and put into hot sterilised jars.

The result:
Bottling my own tomatoes at home has reduced the amount of far-away foods in our diet, reduced our tomato costs by half, made us more resilient, reduced waste, and they taste better than factory-bottled ones. It was an enjoyable time with family, with all of us appreciating the process and the results.

Spiced Elderberry Oxymel (a herbal cold and flu medicine)

OLYMPUS DIGITAL CAMERA

Here is a simple way to make a healthy medicine for the cold months ahead. I can’t say enough good things about elderberries, and this way of preserving them for the winter can be used either as a daily boost to health to prevent colds and flus, or as something taken when you are sick to relieve the symptoms and get rid of the cold or flu quickly. This recipe is cheap to make, using stuff that’s always in my kitchen.

You will need:
Elderberries
Optional spices (see step 3)
Raw apple cider vinegar
Raw honey

1. First you will need to find an elderberry tree in fruit. I found these in the first month of autumn and in the garden of an old homestead we were visiting. Sometimes trees are on the side of the road, or branches are hanging over someone’s fence. Elder trees are beautiful to look at and many people have them growing in their garden as ornamentals that don’t end up being harvested. They’re supposed to be quite easy to grow, and the leaves and branches are good goat food.

14837696670_8bd85ded78_z

Photo credit: here

2. Carefully harvest the bunches of fruits off the trees, gather as much as you’re likely to use. I started with around 2 litres of loosely packed bunches and ended up with around 1300ml of oxymel.

3. Wash the berries and gently strip the berries from the twigs into a cooking pot, it doesn’t matter if a few small twigs get in too. Mix in a small amount of water (for around 1200ml of berries at this stage I added half a cup). Add some spices now if you wish, I added 1/2 inch of grated fresh ginger, a pinch of ground cloves, 1/2 teaspoon ground nutmeg and 1 teaspoon cinnamon.

4. Bring the berries to the boil with the lid on, then remove the lid and continue to cook, while squashing the berries with a wooden spoon to extract the juice and evaporate some of the water. Do this for 10-20 minutes, being careful to not evaporate too much of the liquid, until it looks like you’ve squashed the berries as much as they can be squashed.

5. Filter the juice through a fine mesh sieve, then continue to squash the berries into the sieve to extract the last of the juice. Pour the juice into a measuring cup or jar to see how much you have. I ended up with 400ml of juice. Allow the juice to cool down to a blood-warm temperature.

6. When you can put some of the juice on the inside of your wrist without it hurting, pour the juice into a mixing bowl and add the same volume of raw cider vinegar and raw honey, so that you have 1 part elderberry juice, 1 part cider vinegar, and 1 part honey.

7. Pour into sterilised jars and store in a fairly cold and dry place. Take 1 tablespoon at a time, either on its own or mixed with water. It’s also good mixed with boiling water as a hot drink.

Enter your email address here to get new recipes and blog posts from The Nourishing Hearthfire.