How much time does it really take to make bread from scratch?

Making bread
The time involved in making bread can be divided into hands-on time and hands-off time.

Some bakers might use a lot of hands-on time, kneading a lot to develop strength in the dough. Other bakers might use a no-knead approach and use more hands-off time, with just a couple of minutes of hands-on time.

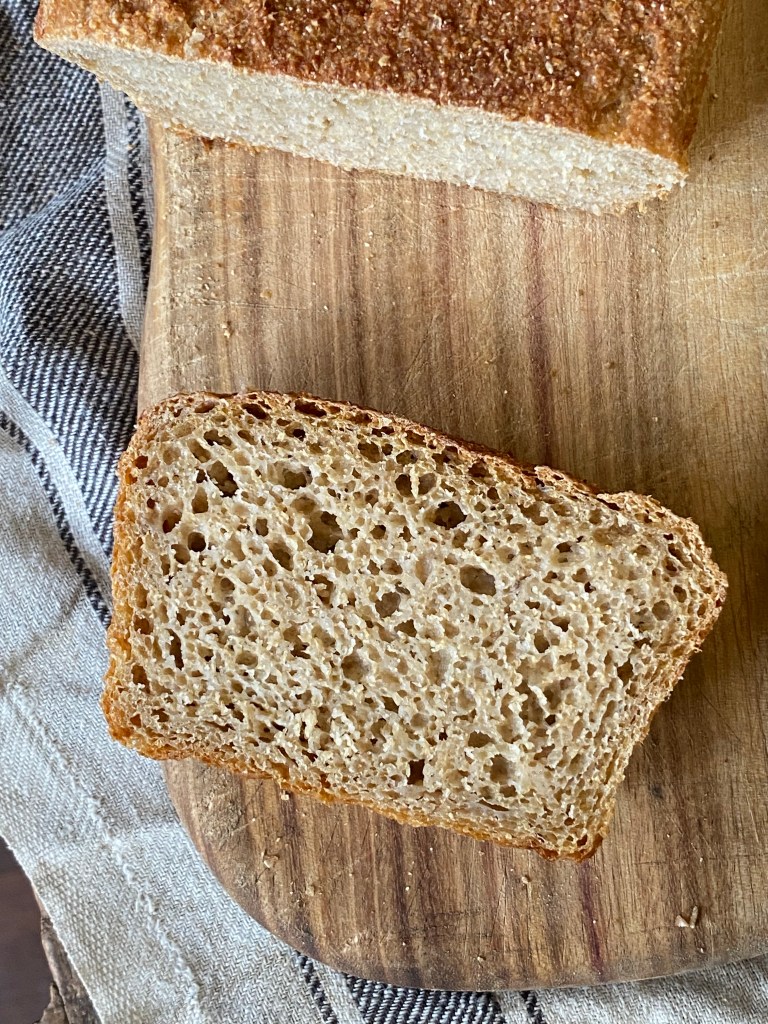
You don’t need to knead your bread at all. The purpose of kneading is to strengthen the gluten. The purpose of having strong gluten is to trap the gasses that add more flavour to you bread, and to make the bread light in texture. By handling the processes of strengthening and shaping bread a bit differently, it’s possible to have light, open, flavoursome bread with minimal hands-on time. Here is a rough guide to how I do this:

Mix until just combined, then rest for at least fifteen minutes.
Mix until no traces of flour remain, not any longer. When working with 100% whole grain flours it’s important not to over-mix, as the tiny pieces of bran in the flour can cut into the gluten and weaken it.

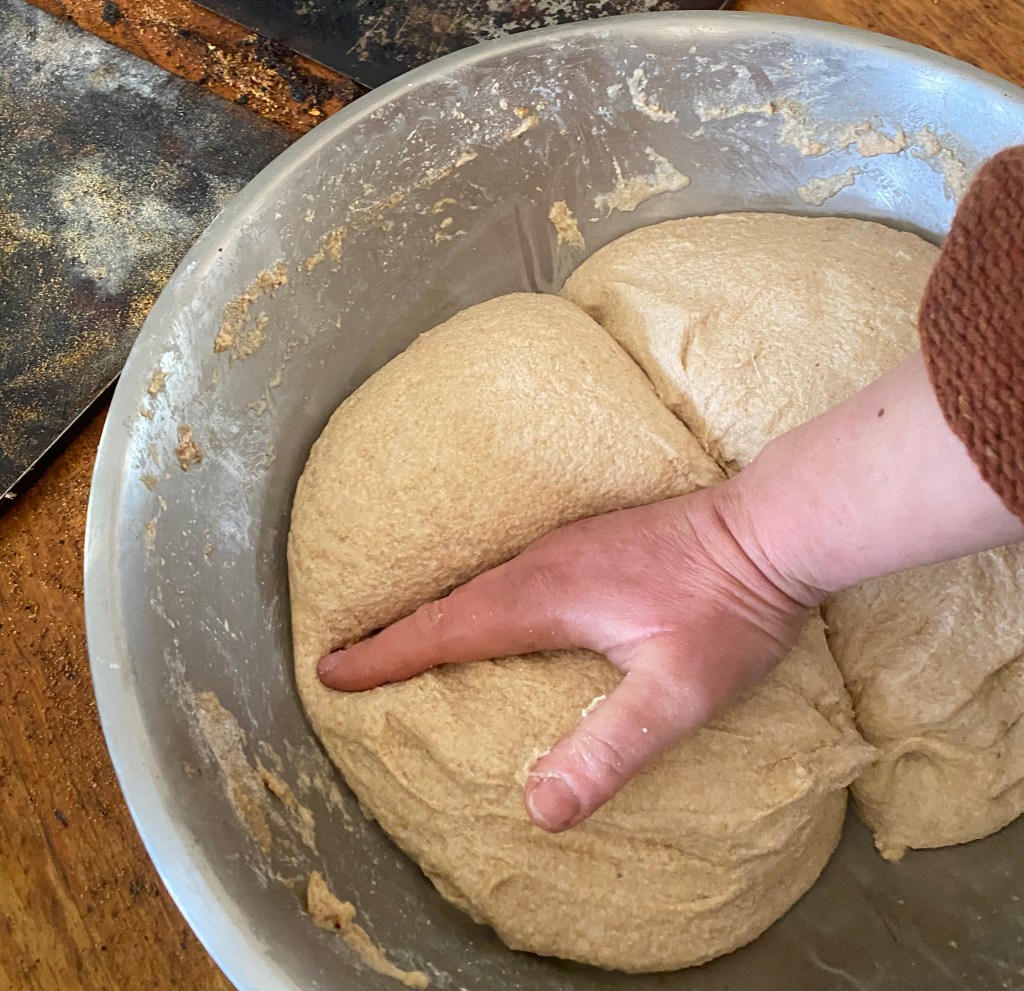
Stretch and fold, or squash and fold.
Allow your dough to sit for around 20 minutes, then do a series of stretch and folds by lifting up half the dough, folding it over the other half, rotating the bowl a quarter turn, then repeating the stretching, folding, and rotating, until all four sides have been stretched and folded. Stop this if the dough starts to tear at any point.

Optionally repeat the resting (rest for 15 to 30 minutes), stretching, and folding up to three more times if you want to.

It’s really not the end of the world if you don’t have time to do this (or if you forget). You’ll still get good bread without it.

Ferment
Leave your dough alone until it’s fermented. If your room is warm enough, it will puff up. If your room is cold, it may not rise much.

The amount of time your dough will take to ferment will depend on how much starter is in the dough, the water temperature, and the room temperature. I adjust the amount of starter and the water temperature to work with whatever room temperature conditions I am facing at different times of the year, as well as adjusting these things to suit my schedule: sometimes I need a bread that ferments rapidly, and make a dough where 50% or more of the flour is prefermented, other times I need a dough that ferments more slowly, and use a smaller amount of starter.

Be gentle when dividing and shaping
If you want nice airy bread, you don’t want to destroy all those bubbles that have been created during fermentation. Don’t pick pieces off one bit of dough to add to the other or try to get it to an exact weight on a scale, just divide into what looks about right.

Shaping
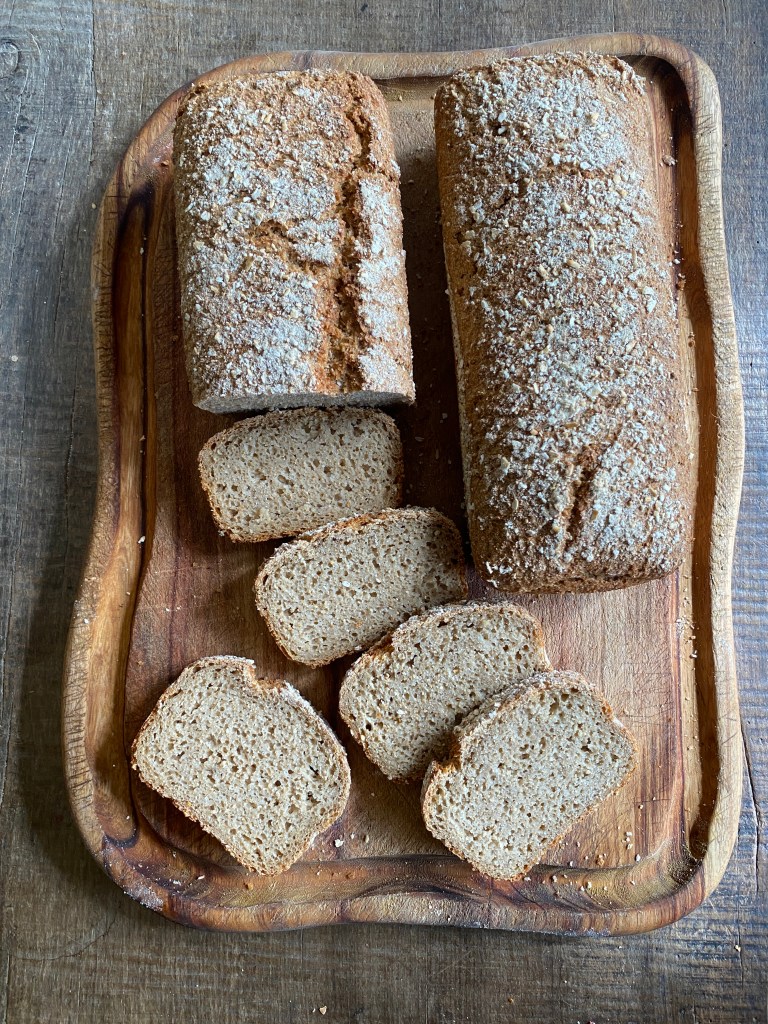
Some doughs don’t need to be shaped at all. If you are really busy and want bread, you can simply just dump your dough into a greased loaf tin (or into a floured towel-lined bowl) and you’ll still get bread. Maybe not as neat as if you’d shaped it properly, but it will still feed you, and will still taste good.

If you want to shape the dough, it helps to observe and to feel what the dough is like. If you haven’t done many stretch and folds earlier, the dough might be a bit weak, and can benefit from preshaping. To preshape, simply fold the dough in half, to form a semicircle, and then fold that in half, to form a quarter circle. Allow it to rest for a few minutes if you like, and then get on to the final shaping.

I do most of my shaping in midair, and it takes a few seconds. Shaping can also be done quickly on a bench. Shaping a boule is simply a matter of imagining an invisible dot on one side of the ball of dough, and tensioning the outside of the dough towards that dot. When the dough looks tight and tense, stop shaping.

For a pan loaf or bâtard, sometimes I am folding it up in thirds like a letter or rolling it like a cinnamon bun, other times I am shaping it as if it were a boule, but instead of an invisible dot, it’s an invisible line. Shaping bread has become instinct for me, and it only takes a few seconds per loaf.

Proofing
Proofing can happen at any temperature. Your bread will proof quickly and rise up in warm room temperatures, or you can delay the baking by moving your bread to a cooler part of the house, or proof it in a fridge for up to 24 hours.

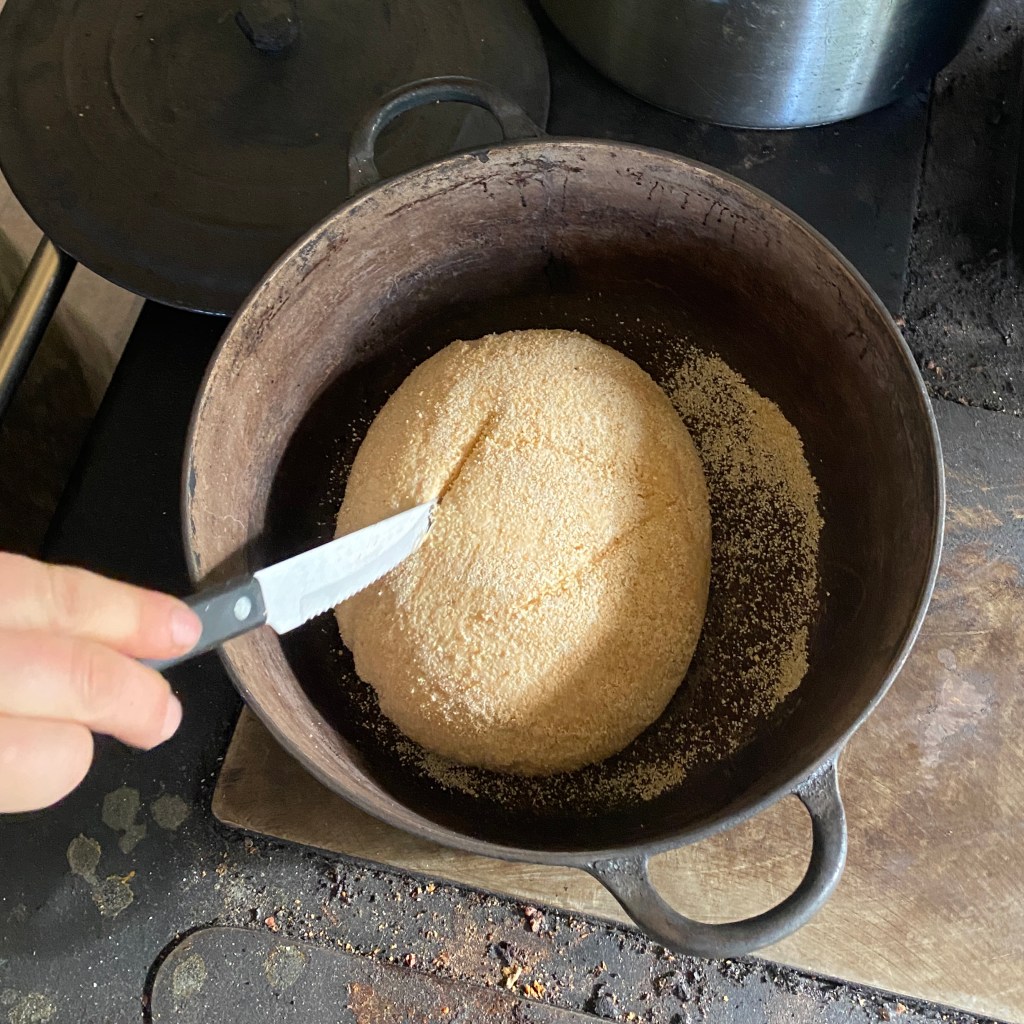
Scoring or not scoring
If you’re baking with a lot of white flour, or if your wholegrain loaf hasn’t risen much in proofing, you might want to quickly slash the top of it with a knife a couple of times before you bake it. I use a serrated steak knife to do this, but most of the time I usually skip this step.

Baking
Baking itself is simply a matter of putting the bread in a preheated oven and waiting.

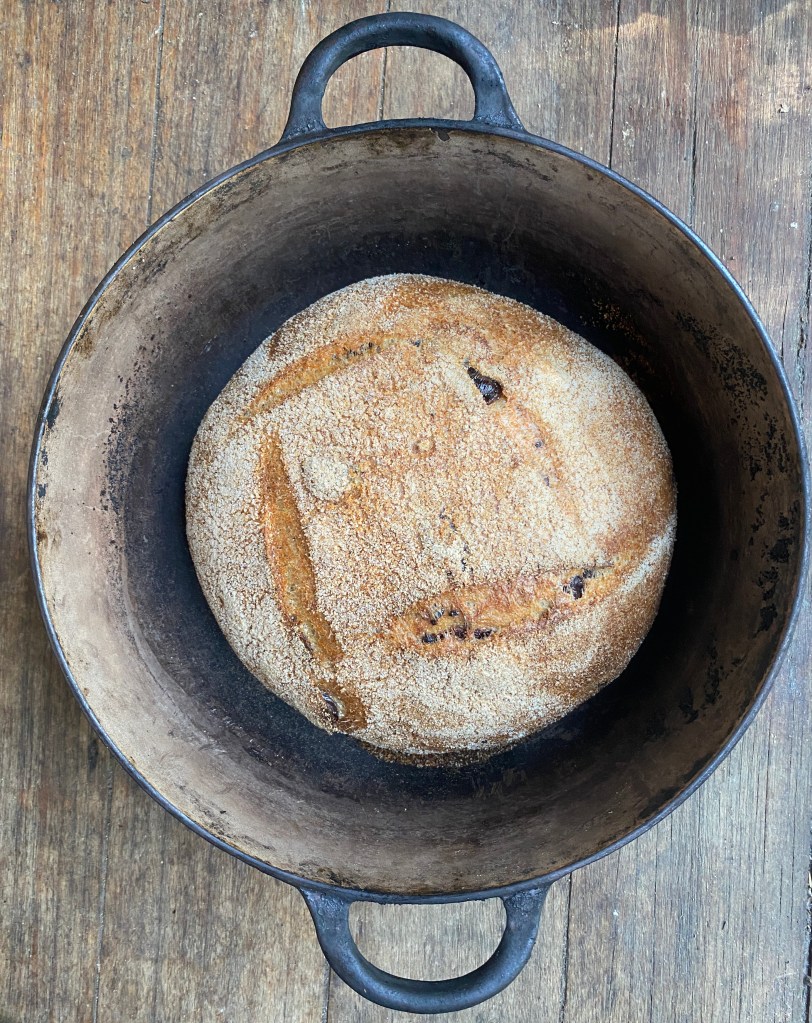
If you’re using the dutch oven method, you’ll want to remove the lid half an hour into baking, but other than that quick step, baking is another hands-off part of making bread.

In conclusion
You can make great bread with only a couple of minutes of hands-on time per loaf. There’s a bunch of steps along the way that you can do (or that you can skip), but for good baking with minimal time, it helps to take a step back and think “what do I actually want to do? And what kind of baking will work in my life?” There are a lot of finicky instructions around about creating special levains, autolyse, pretty score marks, and more, but all these instructions do no good if you are too busy to follow them. Think about your schedule, and when it would suit you to do each real stage of baking (mixing, strengthening, shaping, baking), and by tinkering with the amount of starter, water temperature, and room temperature, you will be able to create breads that work in your life.

These past couple of years I’ve been working on a book of sourdough recipes to help more busy people make all their own bread, pizza, and pastries. Along with the recipes, I’ll be showing how to adjust recipes to get them to work for different schedules and seasons, and strategies for baking bread even at the very busiest of times. The book will be launching on Kickstarter in a few days time. I will share a bit more about it in my next post.

Getting started with bread baking on a budget

Be adaptable
Don’t get fixated on baking with this or that heritage grain. Look at which grains and flours are most affordable where you live, and work with that. Wheat gets a lot of negative attention, but wheat can be a nourishing food for many people if it is organic and made into sourdough bread.

Buy in bulk
Buying directly from farmers and distributors in large bags can bring a lot of savings. Buying a 20 to 25kg or 50 pound bag is usually the best value. Whole unmilled grain will keep for many years in buckets or barrels, and whole grain flours can keep for several weeks if they are in a cool part of the house.

A grain mill can make sense if you bake a lot.
I save roughly $2 per kilo (or $1 per pound) by milling my own grain. In one year of milling enough flour for my family, I am saving enough money to nearly pay for two grain mills! Many grain mills come with a 12 year warranty, and in 12 years of milling even a small household is likely have saved enough in flour costs to justify the grain mill. Freshly milled flour is more nutritious and has more flavour than old flour too.

My grain mill. A simple motor turns one stone against another and grinds grains into flour.

Look at what homemade bread can replace
The most obvious thing to replace is store-bought bread: replacing this with homemade will save money and bring better nutrition, but we can go beyond that and find ways to make other meals cheaper by using homemade bread instead of more expensive foods.

Once upon a time I used to bake a lot of sweet foods and treats, at that time I used to also wonder where all our money disappeared to. These days I bake a lot of bread, we eat a lot of bread, and I might make a dessert or sweet treat every week or two. Bread served with butter has better nutritional value than sweet foods, and is a lot cheaper and faster to make. Toast with some jam or honey can be enough to satisfy a sweet tooth, and works out to be a lot cheaper than baking a cake. The same goes for breakfast cereals and snack foods, which can be very expensive to buy: we just don’t buy or make these things, but we always have homemade bread on hand.

Make your staple bread recipes be lean breads
I bake three or four loaves a day of simple bread that is made from just flour, water, sourdough starter, and salt. If I were instead to make sandwich bread, brioche, or other breads enriched with fat, sweeteners or eggs every day, the cost of my bread would increase massively. The lean breads I make are wonderfully tasty, can still be used for sandwiches, and are nutritious, affordable, and sugar-free.

Don’t rush out and buy all the gear that people say you need to buy
A bowl and a tea towel works just as well as an expensive bread proofing basket. Loaf tin breads can be just as tasty as dutch oven breads. You can still produce good bread without a baking stone or a way to steam the oven. Start with what you have, figure out what you like to bake, and slowly get the gear over time to bake in the way that best suits you.

You can get started making bread with nothing more than a mixing bowl and a loaf pan.

Sourdough is cheaper than yeast, and it doesn’t have to taste sour
Yeast is something that needs to be purchased again and again, but your own sourdough starter can be kept alive at home, at no more cost than a bit of flour. There are many techniques and recipes around, some are designed to get a lot of sour flavour, others designed to have less: experiment and see which recipes you like the taste of. There are ways of managing a sourdough starter that create no waste, so that you can completely remove any yeast costs from your food budget.

Bread can be the cornerstone of your kitchen: toast for breakfast, bread on the side of a meal, a slice of bread served with soup or stew to make the meal more filling. There are ways to make great bread on a budget, and ways to make bread in a busy life. In a few days time I’ll be sharing my strategy of making great sourdough bread with minimal hands-on time.

The power of bread: how homemade bread can transform your life for the better

If you eat bread, the quality of bread you are putting on the table could be contributing to your health, or slowly making you sick. The best way to have healthy bread on the table is to make it yourself.

It can be overwhelming to get started, but it doesn’t have to be.

Many years ago when my husband and I were working on a farm on the other side of the world, I made a list of things I wanted to start doing when we got back home. Making bread was at the top of the list. When we got back, I borrowed a book from the library, followed the instructions, and made my own bread. It wasn’t as healthy or as tasty as the bread I make now, but it was homemade bread, and it changed my life.

Before that time, needing to get bread was what made us go shopping twice a week. We didn’t eat soy, and at that time there was only one kind of bread that didn’t have soy in it. If anything happened to that bakery’s deliveries, if other people bought it before we could, or if the bakery closed up for a week to go on holiday, we were out of bread. By taking charge of one small aspect of our food supply, it made us more resilient to emergencies and supply disruptions, and meant that I had more time at home.

In our home, bread has always been an important part of how we eat. It makes an easy breakfast or light meal, a quick snack, and something extra to fill in around the corners of lunch or dinner. By making our own bread, we have healthy and tasty bread, in abundance, made at home for less than it costs to buy bread.

There is a rhythm to making bread that can be nourishing and grounding in a busy life. Every night I feed the starter or begin a dough, every day I finish the dough, shape it, leave it to rise, and then bake it. For me it’s not one extra thing to have to remember in a busy day, it’s an essential part of life.

Even if I didn’t bake every day, I would still enjoy the process of mixing ingredients, developing the dough, watching it ferment, smelling and feeling it to see if it’s ready, and baking it. These processes don’t actually take up much time, and can fit in here and there among other kitchen tasks. It is an amazing feeling to pull a loaf out of the oven, smell the delicious smell of freshly baked bread, see how it’s sprung up in the oven and developed a golden-brown crust, and know that this is our bread, and that I’m making something this delicious from scratch.

5 reasons to make your own bread

Frugality
Making bread at home is far cheaper than buying it. The savings don’t stop at bread, there are many other recipes you can make at home with sourdough, from pizza, to flatbreads, burger buns, pancakes, pastries, chocolate cake, soda bread, pies, and more.

Health
When you make your own bread, you know exactly what goes into it.

Taste
You can create the best tasting bread at home. By making bread at home, you can enjoy the very freshest bread, the best ever pizzas, cinnamon buns, and other treats.

Lifestyle
The more food you can produce at home, the more you can stay at home doing the things that you like to do. The process of making sourdough bread can also be relaxing in a busy lifestyle.

Resilience
In the time of supply disruptions and panic buying in 2020, bread was one of the first things to be emptied from the shelves. By making our own bread, this wasn’t something we had to worry about. Making bread is something anyone can do towards self reliance.

How to make real pasta without a pasta machine

Making pasta at home is easier and cheaper than you may think. In this post I’ll share my method and thoughts on homemade pasta.

Why make pasta at home?

Dry pasta is pretty much empty calories, wrapped up in plastic. Homemade egg pasta is a really tasty way to eat eggs that even picky eaters enjoy, and because it’s so rich in nutrition from the eggs, sauces can be really simple to make a nourishing and filling meal.

Every week when we have enough eggs from our hens, we make pasta every Monday. This helps me with meal planning because it means there’s less days when I have to figure out completely what I’m making, but there’s still enough variety in pasta that we never get sick of it – sometimes it’s carbonara, other times pesto, sometimes a creamy cheesy sauce, sometimes garlic butter and greens, sometimes it’s oriental noodles with bacon and vegetables, sometimes just lots of butter and grated homemade cheese, if you think of any possible pasta or noodle dish, it can be made with homemade pasta, and that gives a huge amount of variety.

How to make pasta

1. Start with eggs.

Crack eggs into a small bowl, sniff each one to make sure it’s not off, fish out any bits of shell, and put them in a mixing bowl. Use around 2 eggs per hungry person.

2. Mix in flour and salt. 

Use around half a teaspoon of salt for every five eggs. For flour, the amount you’ll need will depend on the kind of flour you’re using. I don’t measure. I just beat the eggs with a wooden spoon, mix in as much flour as I can mix with the spoon, and then keep adding flour, mixing with my hands. If the dough still seems sticky, keep adding more flour, kneading it in with your knuckles. Break the dough apart, and if it’s still sticky inside, sprinkle the sticky sides with more flour and knead that in with your knuckles. The trick to adding flour is to just add a small amount at a time, and keep adding until the dough is very stiff. I use 100% wholemeal wheat flour from my grain mill, but other kinds of wheat and spelt flour will work too.

3. Rest

Allow the dough to rest for at least half an hour, covered with a tea towel or plate. A longer rest is fine too.

4. Roll out and cut

Divide the dough into manageable pieces. Use a rolling pin or a clean glass bottle to roll each piece as thin as it will go, or as thin as you have patience for, dusting the dough with flour to prevent it from sticking. Use a butter knife to cut into strips, or your choice of pasta shapes. When you’ve cut some pasta shapes, spread them out on a tea towel (dish towel) to dry out. Keep in a single layer if possible, as they can get stuck together if you stack them too high.

5. Cook

This next bit happens really quickly once the water is boiling, so make sure you have the sauce ready, along with all the bowls, cutlery, drinks, telling everyone it’s nearly ready, and so on. Bring a large pot of salted water to a rolling boil over high heat. Add the pasta, and bring it back to the boil. Once it’s boiling, cook for three minutes. Drain in a colander. You can either mix the pasta into the sauce, or put the pasta in bowls and top with the sauce, whichever you prefer.

Enter your email address here to get new recipes and blog posts from The Nourishing Hearthfire.

Root cellaring without a root cellar: Simple off-grid food storage

buckets of vegetables packed in leaves

You may be wondering why I have three buckets of leaves in my laundry…

This is how I store root cellar vegetables through the winter:

1. Gather dry leaves in autumn

It can be a bit tricky here some years finding the right time when the leaves have fallen but have not become a sodden mess from autumn rains. I’ve used both maple leaves and blackwood leaves, and both work well, as long as they are dry. Any kind of fallen dry leaves will probably work. Leaves can be stored in old feedsacks in a dry place until needed.

2. Select the right vegetables in perfect condition.

Don’t store any that have cracks or bruises, or any that are missing their crowns. Suitable vegetables include beetroot, carrot, parsnip, turnip, swede/rutabaga, and other roots.

3. Pack a layer of leaves at least 1” thick in the bottom of a bucket or 55 gallon drum.

Top with a layer of roots, making sure they don’t touch. Cover with enough leaves so that you can no longer see the roots, then top with another layer of roots, repeat until you get to the top of the bucket. It’s best not to put the lid on the bucket, as this can cause condensation to drip down, but if you need to store your roots somewhere where mice might get to them then you may have to use the lid – just make sure you have an extra thick layer of leaves on the top and on the bottom if this is the case.

4. Store in a cool place. 

I use an unheated room in my house that is easily closed off from the rest of the house and does not get sunlight during the winter. The ideal temperature for root cellaring is between 0ºC and 10ºC (32ºF to 50ºF), but up to 15ºC (60ºF) and even a little higher will still work – it just won’t store for quite as long as it would at lower temperatures.

The benefits of root cellaring, even if you don’t grow all your own vegetables:

Food security

By storing vegetables for weeks or months, it means we have more food in the house, for longer, so we are not affected by supply disruptions and other issues that seem to be happening frequently these days. It also means we don’t have to go food shopping as often.

Saving money

When we don’t grow enough vegetables of our own, I buy vegetables in bulk directly from the farm and it works out less than half the price of buying in the shops.

Extending the season of local vegetables

There is a “hungry gap” in many places when the local farms run out of many storage vegetables before the new season vegetables are ready. For growing our own vegetables, root cellaring means I can get the vegetables out of the ground and use the space for a green manure crop or other crop earlier than I could otherwise, or I can pull them out before they bolt to seed in the springtime and still have root vegetables on the table for a few more weeks. By root cellaring, I can keep storage vegetables around for just that little bit longer. Beetroots seem to keep the best out of everything I have tried, but all root vegetables will keep in this way for some time.

Other vegetables, and how to store them without electricity

potato clamp

• Potatoes don’t need to be packed in leaves – just store them in hessian bags, paper sacks, or cardboard boxes and keep them in a very dark, fairly cool place. In climates with mild winters, potatoes can be stored outdoors in a “clamp” – just put straw or hay on the ground, heap with dry, undamaged potatoes, cover with a thick layer of straw or hay, and then cover with dirt.

• Onions and garlic also don’t need leaves – just keep them loose in an airy, dry, fairly cool place. They like to be hung up high if possible. For our homegrown garlic, I plait it and hang it up when I can, or store it loose in a single layer in a box. For the onions that I buy, I keep them in netted bags, hung up from the edges of shelves.

sauerkraut and kimchi in fido jars

• Fermenting is an excellent way to store vegetables while increasing the nutritional value – either grate or shred vegetables such as cabbage and turnip and mix with salt for them to make their own brine, these vegetables, along with most other vegetables can be preserved whole or in slices in a salty brine. Make sure you use enough salt to ensure that they keep well – between 2% and 3% of the vegetable weight is usually a good amount. Keep in a cool place. Many fermented vegetables will keep for a year or more. See my instructions for fermenting vegetables here: https://thenourishinghearthfire.com/2016/04/18/7-secrets-to-making-successful-sauerkraut-every-time/

• As well as being fermented, cabbages will keep for a month or two loose on a slatted shelf (the outside layer of leaves might start to go bad, but the insides will be fine), for longer storage, the stems can be planted in soil or damp sand.

• Pumpkin/winter squash likes to be kept fairly dry and a little bit warmer than root cellar vegetables, at around 10ºC to 13ºC (50ºF to 55ºF). I am still learning and experimenting with how to best grow and store this tasty vegetable, so feel free to comment with any tips that you have for storing it well, or growing and storing any vegetables well for that matter.

Enter your email address here to get new recipes and blog posts from The Nourishing Hearthfire.

Creating a cheese book for the rest of us: Natural Small Batch Cheesemaking

When I first started making cheese I thought I was failing at it. The recipes said to stir constantly for a full 45 minutes or so, and in my busy kitchen I just could not do that.

The more I perfected my own style of making cheese, the more I began to think back about how things were done in the past: was the busy peasant really stirring for that whole time? Or did she, like me, also have many responsibilities in the kitchen and on the homestead.

Early on I also began to question the use of all these tiny expensive packets of ingredients. Why did the mozzarella recipe tell me to dilute citric acid with water? Couldn’t vinegar be used in the same way? I experimented, and it worked, and paved the way to more experimentation, and learning how things used to be done.

I think a lot of books are written from a specialist perspective: someone that has focused on just one thing, written about it in isolation, without providing any guidance for those who do not have the same perfect conditions. I like to think of my book as being written by a generalist: Yes, I am making all my family’s cheese, it’s an important part of my homestead and I love it, but I am also fermenting, baking, canning, preserving, gardening, butchering, caring for animals, building infrastructure, and all the other tasks that make for a diverse homestead.

I don’t ask you to stand there stirring for 45 minutes, because I know that it’s not possible for many people. I don’t ask for weird little packets of stuff grown in labs, because I know it’s possible to create great cheese without these. I’ve read between the lines of many cheese traditions and figured out a way to do this that’s perfect for the busy homesteader, and also suitable for the complete beginner. I’ve created a book that anyone can pick up and learn from, and once you’ve learned the basics, you’ll still be referring to it again and again as I’ve provided a lot of depth, and presented it in a way that isn’t overwhelming.

You can learn to make cheese even if you don’t have your own dairy animals, and my small batch recipes are perfect for learning – there’s less time to wait before you get to taste them, and they’re naturally made from smaller amounts of milk. Most cheese books are using between eight and twenty litres (two to five gallons) of milk and this can be a very expensive experiment for anyone that is learning. Most of my recipes can be made from four litres of milk or less. These recipes are perfect for anyone, whether you have a small herd of goats or a single house cow, or if you’re buying your milk.

If you’re interested in learning more, please feel free visit the Kickstarter page about my book and click “notify me on launch”: https://www.kickstarter.com/projects/706848724/make-your-own-cheese-natural-small-batch-cheesemaking-book?ref=7ho2mj.

The Kickstarter launches on the 15th August at 5pm USA mountain time (16th, 9am Australian eastern time), I’ll send out another quick post once it is live.

I’ve priced the book really affordably and provided a lot of bonuses that are only available while the Kickstarter is live. Also, if you back it in the first couple of days you’ll also get access to this extra earlybird bundle of ebooks and magazines.

For more details about the earlybird bundle, see here: https://permies.com/t/223565/Earlybird-bundle-cheese-book-kickstarter

Quinces: How to prepare, cook, and preserve them

Quinces are an easily-grown fruit that’s often ignored in modern diets. Not many people know how to properly prepare them, and they can seem a bit fiddly and slow to cook compared to other fruits.

I think it’s definitely worth learning to prepare and cook quince – they are like no other fruit, and there’s something deeply warming about the way they taste on a cold autumn day. 

My favourite way to cook them is to slowly simmer them in a spiced syrup. I make a large batch, we either eat them over the course of a few days, or water bath can them to store for later.

I also enjoy making quince jam – delicious on top of toast, porridge, and rice pudding. I’ll also share the recipe for this here.

Quinces in basket

How to find quinces

If you live anywhere where apples and pears grow, you can probably find quinces. They are part of the pome fruit family, related to apples and pears. Dwarf pear trees for home gardens are actually grafted onto quince rootstock, as they are so closely related.

Quinces are ready for a brief season in mid to late autumn. There are several different varieties, and they’re usually ripe in the second and third months of autumn. Ripe quinces have yellow skin and pale flesh, which turns red or pink when cooked.

Quince can be hard to find in shops. Look for roadside fruit stands, and buckets out the front of houses with fruit trees.

How to prepare quince

Get a very big bowl or pot and put 4 litres (1 gallon) of water in it, along with 2 tablespoons cider vinegar and a teaspoon of salt. This acid water will help prevent the quinces from browning while you’re cutting up more of them.

Peel each quince and put in the acid water. Once they’re all peeled, cut the top off each one, then cut each one in half, and then in half again, to form four wedges. 

Now it’s time to remove the cores. Begin by using the knife right at the edge of the quince quarter, starting at the top, where the stem was. As you work your way downwards, allow the knife to follow the grain of the quince, so that you’re skimming along as close to the gritty and tough core as possible – this is something that is picked up over time. If you get a bit of gritty core in with the quinces, it’s not the end of the world, if you skim off too much, then that’s just some extra scraps for the goats and not for you. 

After coring, put the quince pieces back in the acid water again and leave them until you’re ready to cook. Peel and core the rest of the quinces and add them back to the acid water too. 

how to core quinces

How to cook quince in spiced syrup

In a 5 litre (5 quart) pot, prepare a syrup for poaching with 2 1/2 litres (10 cups) water, 800g coconut sugar (4 1/2 cups) or honey (2 1/3 cups), and some optional spices – I like to add 10 smashed cardamon pods, 1 cinnamon stick, and 2 star anise. Bring to a simmer on the stove and keep warm. These quantities will give enough syrup to cook between 4 and 5 kilograms (9 to 11 pounds) of quince.

Once all the quince is prepared, put them in the hot poaching liquid, adding more water and honey if it needs it. Quinces shrink a little while they’re poaching, so it’s fine to have them fit quite snugly together, but there should still be some extra syrup at first, and any extra can be used for poaching another batch of quinces, or making baked syrup dumplings, so it’s better to have too much syrup rather than not enough. 

Gently simmer over a medium-low heat for at least forty minutes, or up to a few hours if the heat is low enough. Quinces are best when they’re cooked slowly. I prefer to cook mine in the oven, as it’s a more gentle all-over heat, rather than the harsh heat that sometimes happens on top of my stove, but you can cook on a stovetop too if you keep the heat very low. 

When cooked, the quinces will be soft, and will have changed colour. They can fall apart quite easily, so handle them gently. 

Now you have a big pot full of cooked quince, ready to serve as a dessert, or add to cakes and pies. Quince in syrup can keep in the larder with the lid on for around a week, or you can put the quinces and syrup into preserving jars, seal in the usual way, and process in a boiling water bath for 40 minutes.

How to make quince jam

Quince makes a delicious jam, perfect with porridge, rice pudding, scones, pancakes, or toast. 

Ingredients

2kg (5 pounds) quinces

1 litre (quart) to 1.5 litres (1.5 quarts) water

1.2kg (2.6 pounds) honey

Method

If you don’t usually make jams, see my blog post here or my book for in depth information about the process.

Prepare quinces in the usual way by following the instructions above. Cut into very small pieces (or use a grater).

Heat 1 litre (1 quart) water in a large heavy-bottomed pot until boiling. Add the quince and stir.

Cook until the quince is very soft and can easily be mashed with a wooden spoon. As the quince cooks, it should fluff up a little and absorb water, so add water, a small amount at a time if it is needed, to form a thick sauce, keeping in mind that the honey will water it down further.

Add the honey, bring back to the boil, and continue to cook, uncovered, stirring every so often, until it passes the “plate test” (see my jam post or book for more on that)

Put your jam in jars in the usual way, Australian hot jar/hot lid/upside down works for this if this is what you normally use, or can in a boiling water bath for 10 minutes.

How to store quince

Quince can be stored for two or three months by selecting the very best, unbruised, undamaged quinces and placing them in layers in a 5 gallon bucket, with each quince surrounded by dry autumn leaves. Store in a cool place, such as an unheated room, a root cellar, or outdoors in the shade.

Quince jam and bottled quinces in spiced syrup will store for one year in a cool, dry place.

a year in an off-grid kitchen cookbook cover
For more seasonal cooking skills, tips, and recipes see my cookbook A Year in an Off-Grid Kitchen: Homestead Kitchen Skills and Real Food Recipes for Resilient Health
Canned quinces, quinces in basket, preparing quinces

Enter your email address here to get new recipes and blog posts from The Nourishing Hearthfire.

A Year in an Off-Grid Kitchen is now published!

I am pleased to announce that my cookbook is now available to buy online and in bookshops – if your favourite local bookshop does not have a copy, it can be ordered in by giving them the title and the ISBN:

Paperback ISBN  978 0 6484661 6 1

Hardcover ISBN  978 0 6484661 5 4

Paperback and hardcover copies can be ordered online through the usual places.

Amazon: https://www.amazon.com/Year-Off-Grid-Kitchen-Homestead-Resilient/dp/0648466167/?tag=pfa12-20

Book Depository (free shipping): https://www.bookdepository.com/Year-Off-Grid-Kitchen-Kate-Downham/9780648466161

The Paperback edition of A Year in an Off-Grid Kitchen

Ordering the eBook through Permies.com gives you access to both the PDF and the epub versions, or the Kindle version can be bought from Amazon.

Permies.com: https://permies.com/wiki/157756/Year-Grid-Kitchen-eBook

Amazon: https://www.amazon.com/Year-Off-Grid-Kitchen-Homestead-Resilient/dp/0648466167/?tag=pfa12-20

How to Make Butter

All you need to make butter is a bowl, a whisk, and some cream.

_A282281-480.jpg

The cream should have no additives, just cream, and if it’s créme fraiche for making cultured butter, then it will have cultures as well (here’s my recipe for culturing cream at home).

Put the cream in the bowl and whisk. After a fair amount of whisking it will become whipped cream. Continue whisking and whisking and the whipped cream will become more yellow. Soon after this you’ll begin to see some liquid forming. Continue whisking, more of the buttermilk will separate from the butter.

_A282284-480.jpg

You don’t have to do all the whisking at once, you can come back to it every now and then. Or you can use a stand mixer or hand mixer.

Once it looks as though all the buttermilk that’s going to come out has been released, strain the butter over a mixing bowl, reserving the buttermilk for recipes.

Put the butter in a bowl of very cold water. Knead with your hands a few times to release even more of the remaining milk.

Drain the water and replace with more very cold water. Knead again.

Remove the butter from the water, kneading as much water out of it as you can. Shape it and store it in beeswax wraps or glass jars. Enjoy!

_A312303-480.jpg

Cultured butter with buttermilk scones, créme fraiche, and honey-sweetened jam.

This post has been shared with Wonderful Wednesday, Friday Favourites, Party in your PJs,

Enter your email address here to get new recipes and blog posts from The Nourishing Hearthfire.

Strategies to move away from cities: Market gardening in small spaces

8426173326_da8d6b0976_z

Photo credit: here

One of the things many folks struggle with when wanting to move to rural areas is income. Since the increased mechanisation of farming less people are needed to work in mainstream farming operations, and there aren’t many jobs available in these areas. People in cities often feel trapped in them, under the assumption that they need a typical ‘job’ in the country in order to move there.

For most people, a move to the country will involve needing to find a local source of income. Market gardening offers us the opportunity to create our own secure jobs in rural areas.
Continue reading