Building a better world… with tomatoes and goats

OLYMPUS DIGITAL CAMERA

Sometimes it’s hard to feel anything but angry about the current state of things, but there are lots of positive actions that can be done that boost personal resilience and wellbeing as well as reducing ecological footprints.

There’s a new book all about this, currently on Kickstarter here. My new book ‘Backyard Dairy Goats‘ is included as a stretch goal on it!

Preserving tomatoes at home

This year I did something I’d been thinking about for a long time. I bottled our entire tomato supply for the year…

I’d delayed this in the past due to annoying finicky instructions that insist on peeling the tomatoes, removing seeds, putting them through an expensive single-purpose gadget, and all kinds of stuff, but in the end I thought it was about time I tried this myself, using nothing more than a kitchen knife.

Our own garden harvest was not that big this year, for a few reasons that I’ve hopefully learned from, but rather than buying in bottled tomatoes from the other side of the world, I found a local organic grower, bought more than 30kg of sauce-grade tomatoes and bottled them all.

This is how we did it:

Step 1:
This step is only worth doing if you have too many tomatoes to fit in your pot at once. Sort through all the tomatoes and separate the damaged and super-ripe ones from the ones that can wait for a bit longer. Put the ones that can wait aside for another day (we preserved our 30kg+ of tomatoes over 3 days).

Step 2:
Wash the tomatoes, remove any leaves and stems (this is a good job for little helpers).

Step 3:
Roughly chop the tomatoes and put them in a big stainless steel pot (I used my 20 litre one).

Step 4:
Heat the chopped tomatoes over medium-high heat, smashing them up as you stir every so often. Once the tomatoes are bubbling you can either bottle them now, or reduce them for a bit. The jars I used were a bit smaller than the passata bottles I’m used to, so I chose to boil them to reduce them by around 1/4 to 1/3, to make for a more concentrated jar of tomato goodness. If you’re using plum tomatoes or paste tomatoes you’re more likely to get away with boiling them for less time, but ‘sauce tomatoes’ here just means any tomatoes that aren’t quite perfect, so they can use a bit of boiling to get rid of the extra liquid.

While you’re waiting for the tomatoes to heat up or reduce, sterilise your jars and lids and keep them warm.

Step 5:
If you’re concerned about the tomatoes not being acidic enough on their own to store safely, then add a tablespoon of cider vinegar or lemon juice to each 500-600ml jar, or 2 tablespoons to larger jars.

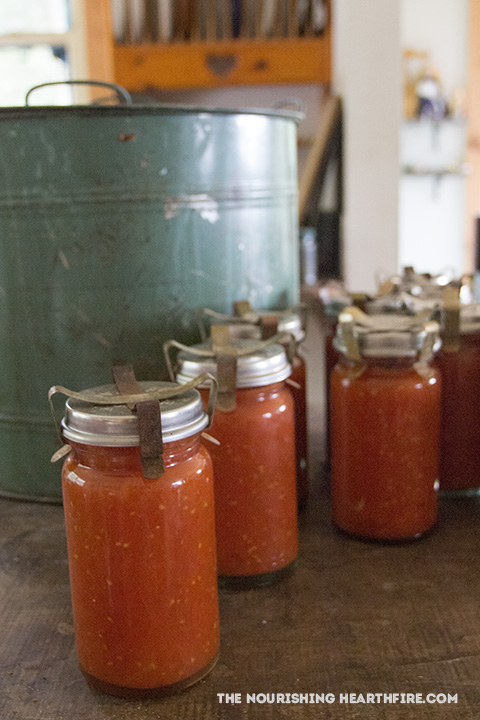
Put the hot tomatoes in the warm jars and seal them with their clips or rings, depending on which jar type you’re using. Put a big canning pot with a false bottom or canning rack on the stove (or use a tea towel or some cutlery at the bottom of a normal pot), put a small amount of warm water in it (so that the hot jars aren’t shocked by a sudden change of temperature), then carefully add your jars. Add more water, so that the jars are surrounded by water either to just above the top of the lid, or at least 3/4 of the way up.

Put the lid on the pot and bring it to the boil, or at least above 90ºC (195ºF). Hold it at this temperature for 40-45 minutes, then allow the pot to sit with the lid off for 5 minutes. Carefully remove the jars using a jar lifter and allow them to cool on the bench before storing.

Fill up the next batch of jars for the pot and repeat until you’ve run out of hot tomatoes, making sure that the water in the pot at the beginning is around the same temperature as the jars. You can do this over two or more days, as long as the tomatoes are brought to the boil and kept hot for a while before bottling, and put into hot sterilised jars.

The result:
Bottling my own tomatoes at home has reduced the amount of far-away foods in our diet, reduced our tomato costs by half, made us more resilient, reduced waste, and they taste better than factory-bottled ones. It was an enjoyable time with family, with all of us appreciating the process and the results.

Raising pigs for meat and lard

OLYMPUS DIGITAL CAMERA

Our pigs at around 12 or 13 weeks old. Healthy Wessex saddleback boars, raised in the forest with portable electric fencing.

How much time does it take to raise pigs on the homestead for meat? How much of a commitment is it? What do you need to get started? How much does it cost?…

I write this partly for myself to read next year, so that I remember how it all works, partly for others who are considering raising pigs.

Continue reading

Nostalgia

OLYMPUS DIGITAL CAMERA

We’ve moved into our house in the forest. We haven’t built the mud room/wood storage area yet so every morning I tromp towards the door in my muddy boots and leave bottles of fresh goat milk on the doorstep before taking my boots off.

During my husband’s childhood milk was still delivered each day in glass bottles, a layer of cream would rise to the top. The bottles would be washed and returned, reused again and again. In my childhood memory is milk still being delivered, but by then it was homogenised and in plastic-lined cartons. The old system of reusing the glass bottles was not done with any thoughts of sustainability, it was just the way things were. It made sense to reuse bottles rather than throwing everything into landfill, or throwing it in the recycling pile to be melted down and turned into another single-use plastic item with the use of a lot of energy. At some point in time it became so cheap to simply make new things all the time, and it became so easy to just throw everything in landfill without a thought that the culture of reuse stopped. This happened more recently with a raw milk farm we were buying from, the farmer decided it was taking too much time to clean the bottles and started using single-use plastic bottles. No thought is given to how much time it took for the oil to form in the earth to make this plastic, how long it will take to break down in landfill, how much time it would take to create these bottles if the specialised bottle-making machines were to break down, or what the end result will be of all the tiny particles of plastic seeping into our soil and water, all that is thought of is the inconvenience of washing something versus the perception of an easy and quick solution.

One of the earliest lightbulbs ever made still functions today. The businesses that made lightbulbs quickly realised that they would make more money if their products had to be bought again and again, rather than being made to last.

The other day I saw an advertisement on an ice cream fridge for a new flavour of ice cream. I could only see half the name and thought it said “red vegetable”. The corporation had become so desperate for new and exciting things that they were now trying to make vegetable flavoured ice creams, to appeal to people seeking new things for the sake of the newness of things. It turns out it wasn’t really red vegetable flavour, but I’ll remember it because it prompted some nostalgic thoughts about the amount of foods around when we were growing up. We had treats sometimes, but it was usually in small quantities, and it usually was a particular thing or another, to be eaten as a treat, rather than eaten because it was new and we had to try it. I don’t remember there being any overweight or obese children growing up in the 80s and 90s.

Autumn leaves now drift gently down from the trees while cold winds stir the evergreens, bringing cold gusts of air while the sun radiates the last warmth of summer. Night falls earlier and earlier every day. Soon our wood stove will be ready and our nights will be warmed with fire.

OLYMPUS DIGITAL CAMERA

_4302427-480.jpg

_4302431-480.jpg

How to Make Butter

All you need to make butter is a bowl, a whisk, and some cream.

_A282281-480.jpg

The cream should have no additives, just cream, and if it’s créme fraiche for making cultured butter, then it will have cultures as well (here’s my recipe for culturing cream at home).

Put the cream in the bowl and whisk. After a fair amount of whisking it will become whipped cream. Continue whisking and whisking and the whipped cream will become more yellow. Soon after this you’ll begin to see some liquid forming. Continue whisking, more of the buttermilk will separate from the butter.

_A282284-480.jpg

You don’t have to do all the whisking at once, you can come back to it every now and then. Or you can use a stand mixer or hand mixer.

Once it looks as though all the buttermilk that’s going to come out has been released, strain the butter over a mixing bowl, reserving the buttermilk for recipes.

Put the butter in a bowl of very cold water. Knead with your hands a few times to release even more of the remaining milk.

Drain the water and replace with more very cold water. Knead again.

Remove the butter from the water, kneading as much water out of it as you can. Shape it and store it in beeswax wraps or glass jars. Enjoy!

_A312303-480.jpg

Cultured butter with buttermilk scones, créme fraiche, and honey-sweetened jam.

This post has been shared with Wonderful Wednesday, Friday Favourites, Party in your PJs,

Enter your email address here to get new recipes and blog posts from The Nourishing Hearthfire.